Showing posts with label decorating. Show all posts

Happy New Year!

As we open the door to 2013, I thought I might look back on some of the final moments of 2012.

I photographed my mantle the Friday before Christmas - as promised - but never posted them because I was busy doing last minute holiday preparations. Better late than never, eh?

On the left side of the mantle I have a vintage(?) tree candle that I've used in years past, two cone trees I made this year, and a crystal jar full of Andes mints. It's not Christmas without those little chocolates. For a tree-making how-to, check out the bottom of the post!


On the right side of the mantle I have an all-white nutcracker I picked up at Home Goods, a gray sweater cone tree from Target (though I think you could easily DIY this with a craft cone, an old sweater and some sewing know-how), another vintage christmas candle and a folded paper Christmas tree I made. I was so excited thinking I had stumbled on a new craft idea until my mom told me my great-grandmother used to make these a looooong time ago. I was a little bummed she burst my bubble, but I'm glad to have something else in common with my late Granny. Again, see the tutorial at the bottom. Several of the mantle trees are elevated by Blomster candle sticks from Ikea. They're designed to hold pillar candles, but if you turn them upside down the flared bases make perfect little display platforms. I only recently added them to the mantle, but they're going to stick around even after the holidays.


The center of the mantle has some little tea lights and a rolled paper wall hanging - have I showed this to you yet? I'm thinking not - that both live there year round, with the addition of all the incoming Christmas cards and the brown paper wreath I made last year. Admittedly it was too small for the space when I made it, but I was making do with what I could get on the cheap. This year I like the idea of floating it in front of the wall hanging to fill up space but still add a bit of holiday cheer. I'm not a slave to the idea that Christmas has to be an explosion of red and green, so I'm just fine with a neutral mantle with a hint of color on the wall.


The last home item we added in preparation for Christmas was Luke's new tire swing! We installed it the day before Christmas - thank goodness for oblivious toddlers because you could clearly see this through the kitchen windows - and unveiled in Christmas morning as a gift from Santa. I would have loved to taken the credit on this one, but it's hard to wrap a whole tree so all the glory goes to the big guy in red. Here you can see the hubby testing it out to make sure the tree branch would hold the weight. So far, so good.


After the chaos of gift-opening had settled some of the "grown-ups" borrowed Luke's new remote controlled robot cars and created our own version of battle bots, with a taped off arena and everything. We called it Robot Slap Fight. It was awesome.


On New Year's Eve Luke's shaggy hair was getting to me so I gave him a haircut. I intended to just give him a trim, but things got a little tricky on the crown of his head so I gave up and buzzed it all. He always looks so grown up with short hair! After I was finished he said "Thank you Mommy. My hair's all better now!" Could he get any cuter?


Shortly after his haircut (and post-haircut bath) hubby and I left him in the capable hands of our family and headed to Greensboro to ring in the New Year with the Avett Brothers - my favorite band and the namesake of this blog. Here are some (terrible) photos as proof:


Since it was New Year's the coliseum was prepared with nets of balloons and confetti cannons to go off at midnight!

As if confetti and balloons weren't enough, those of us in the back of the arena got a special treat. Halfway through the show the band came over to a small stage right in front of us and played a mini-set for us. It was like I was back in college, seeing them in a tiny venue again!


Also, after all these years, I FINALLY bought an Avett Brothers t-shirt. I typically don't buy concert/band shirts when I'm at shows but then I always regret it once I get home. Not this time! Plus, I now have a new shirt-buying strategy for concerts: go to the merch booth as soon as the band leaves the stage after the regular set. While everyone else is clapping and screaming for the encore, you can rush right over to the merchandise and walk right up, no wait! Then you're back in your seat in time for the encore. Alas I can't take any credit for this, the idea was all my hubby's.

image source

So that's how I finished off 2012. I still have lots of Christmas goodies to eat so the holidays are going to last me well into the new year. How did you ring in 2013?

Without further ado, here are the tree tutorials...

-----------------------

Brown Cone Tree
time: 1-2 hours, depending on how thoroughly you glue
cost: $10 or less
supplies:
- craft cone
- jute, or other thick twine
- hot glue gun, several glue sticks
- scissors
directions:
- starting at the bottom, wrap cone with jute and glue as often as needed - I glued pretty much the whole thing
- that's it, you're done

White Cone Tree:
time: 2-3 hours
cost: $10 or less
supplies:
- craft cone (or make your own out of cardstock)
- crepe paper streamer
- silver sharpie, or whatever accent color you choose
- tape/glue
- scissors
directions:
- based on the height of your cone and the width of your streamer, mark where you want each layer to "sit" on the cone
- color a 1/2 inch accent band along the bottom of the streamer - the sloppier the better
- starting at the bottom, wrap the streamer (loosely) until it goes around the cone 3 times - cut streamer
- cut slits in the streamer, starting from the bottom, roughly 2/3 the way up - again, sloppy is fine
- wrap the streamer around the cone 3 times and tape/glue to secure
- repeat steps 2-5 for each layer until the cone is covered
- NOTE: be sure to line up streamer seams in the back of the cone - no one will see that part, so keep the front looking neat

Folded Paper Tree
time: 2-3 hours
cost: free, unless you have to buy a magazine
supplies:
- magazine (I used an issue of Architectural Record, but something hefty like Cosmo or National Geographic is perfect - People or US Weekly would be too puny)
- bone folder (optional)
directions:
- I used this post by Homemade Mamas and it's pretty simple. They link to a separate video tutorial, but I didn't feel the need to watch it.
- just fold, fold, fold!

Christmas?

Wow, I am on a roll.

Last year I did the 12 8 Days of Christmas where I shared all of the wonderful and festive things I did to prepare for Santa. This year, to top that, I posted about Halloween, cats, and then... nothing. It is 4 days until Christmas and I have nothing (blog wise) to show for it. In my defense, I was unemployed last Christmas which left plenty of time for crafty shenanigans. This year, I am gainfully employed (yay!) but that unfortunately puts me in the position of crafting or blogging, but not both. Plus, I'm just really tired, man.

I didn't go as much into decorating mode this year - meaning I didn't decorate my guest bathroom and I didn't strew pine cones everywhere - but I did cover the basics.

Tree up, lit and decorated? Check.

Stockings hung by the mantle with care? Check.

Presents wrapped and under the tree? Check. Presents wrapped in reusable fabric bags? Double check.

I didn't get around to making any oyster crackers or holiday bark this year, but we canned a bunch of homemade marinara sauce - using tomatoes from our garden, no less - to give as gifts instead. So, yay. I did however get around to crafting a few things for the mantle and I plan to take a few quick photos tonight to share with you. If I don't - and that's a big if - just pretend my mantle looks exactly like something out of Martha Stewart Living. Because it totally does.

But just so you don't think I'm making all this up, here's some Instagram pics of our family getting in the holiday spirit.

Daddy and Luke decorating the tree

tree lit up with Christmas Village and fabric-wrapped gifts

new monster ornament made by Dull Roar Studio, aka my good friend Libby

a few of my favorite Christmas ornaments

wall hanging, of sorts, I made from framed Christmas cards, also by Libby

So there you have it. Photographic proof that Christmas exists at our house this year. Like I said, I will try really REALLY hard to take more pictures for you guys this weekend, but if not this will have to do. 

Merry Christmas!

Laundry Room

We're living in exciting times. We have a black president. Electric cars are available and (somewhat) affordable to the public. And we have this little thing called Pinterest.

It's like someone read my mind, sifted through the tumbleweeds in there, and made my wish come true. Before Pinterest I would email myself things I wanted to remember, so my inbox was a jumble of recipes, crafts, hair tutorials, clothes, and a few dozen actual emails. Now I can organize all the wonderful things I find on the internet. Not that this is news to anyone on the internet...


The downside is that I am also bombarded by beautiful homes with elements I want to put into my dream house.* I am particularly weak in the knees for cozy yet organized closets and laundry rooms. There are so many good ideas it would take a monster of a house to contain it all.
*Dream house meaning keep dreaming, it ain't gonna happen any time soon.

Today, in an effort to tame the madness (and because I was bored at home while the hubby played tennis) I laid out my dream-yet-still-practical laundry room.

Most items in this layout are fairly standard. Fancy front-loader appliances: check! Folding surface, ample cabinets, and utility sink: check, check, and check! But what kind of architect (and Pinterest fan) would I be if I didn't add a few special items?

When I saw this pin, I fell in love with the idea of hide-away sweater racks. So smart!(5)

source unknown

Ever since I bought my laundry sorting best friend I knew I would have to incorporate some bins for clean clothes - one for each member of the family. (6)


And if I end up with a combination laundry/mud room (which just seems practical) then I have to have this super snazzy bench with coat hooks and hidden shoe cubbies. (10)

source unknown
What would you put in your dream laundry room?

Tonight's the Night to Fake It

Or tomorrow night, whenever you get around to it. Of course, by "fake it" I mean use Photoshop to make something awesome that only looks like you spent hours meticulously writing with chalk.


My mom found this quote and asked me to lay it out and print it for her. She wants to put it in her office because she has difficulty telling people no at work. Or ever.

At first I was just going to pick a pretty font and be done with it but when I found this tutorial by Foolish Fire on how to fake a chalkboard effect I knew I had to try it. I will leave the Photoshop instructions to her, but my basic process was this:

1) I laid out my text in Illustrator. I used a variety of different fonts to create the composition you see above.

2) I printed my file and traced everything onto white trace paper. To add to the chalky texture I used a pencil (both HB and 2B, for you art supply nerds) instead of pen and added dashes and fills to give extra differentiation to the fonts.

During this step I also gave some extra personality to a few parts. The "but" didn't have the curled line work so I free handed it. The "please everybody" didn't curve like that so I tweaked each letter by hand. I just drew a curved guide-line in Illustrator so I knew where each letter would need to extend to.

3) I scanned the hand-drawn artwork and made some adjustments in Photoshop, following the tutorial. If you're comfortable with Photoshop this is a simple process, but if you're just learning it's probably a little more difficult. Either way you really do need full Photoshop for this, a simpler photo editing software won't cut it.

So that's it! I just need to print this bad boy and pop it in a frame then I will have some free and (mostly) easy art for my mom. What have you made lately?

P.S. - If you like the artwork feel free to download it for yourself! It is sized to an 8x10 but you could scale it down if you'd like it smaller. Leave me a comment telling me where you plan to hang it, and please don't use it for commercial purposes. Thanks!

Bedroom

I recently had a little money fall into my lap and we're juuust financially stable enough that my hubs reluctantly agreed to let me spend most of it on spiffing up our bedroom. You never have and never will see the 'before' of my bedroom because it was beyond embarrassing. The new-ish bed we still like, but everything else was terrible. I still like the vintage vanity but it doesn't really fit in the room - plus the hubby never really liked it - so it's finally on its way out. Our other 2 pieces of furniture I've never pretended to like - my childhood dresser (light wood, country chic) and his childhood dresser (dark wood, super traditional) don't match our aesthetic, the bed, or each other so they both have to go. I also learned the hard way that I don't like white bedding. Between the cat hair and body oils (gross!) it never looks clean enough so I'm replacing it, too. Throw in some new artwork and a pillow or two and I had made some major progress.


I was too busy/lazy to document the process as I went along so I'll do one big post once everything is in place. In the mean time I will tease you with this snapshot of the mini-gallery wall I put together over the (new) dresser. I'm in love.

Mantle Gets A Makeover... Twice

This is a prime example of how terrible I can be about blogging regularly. When I wrote the first draft of this post it was shortly after New Year's and I had just packed away the holiday decorations and given my mantle a new look for the new year. Well, it is now April and I have since tweaked the mantle design. Ideally I would have posted about each layout on its own, but it feels wrong to write a whole post about what my mantle used to look like so I'll include them both in one post. Consider it a freebie.

Here's what the mantle looked like for Christmas. A little holiday cheer with lots of simple neutrals. Riveting stuff but let's jump to the present, shall we?


MANTLE 2.0


This mantle-scape is a little bland but serviceable. I was trying to go for quirky and (believe it or not) asymmetrical. But looking at the photos, this is anything BUT asymmetrical. I have true symmetry on the ends and in the center, with what I can implied symmetry in between. And above it all is my winter wreath. I didn't design it this way, but the wreath has nothing going on in the way of Christmas or snow, I figure it can hang around for a bit.

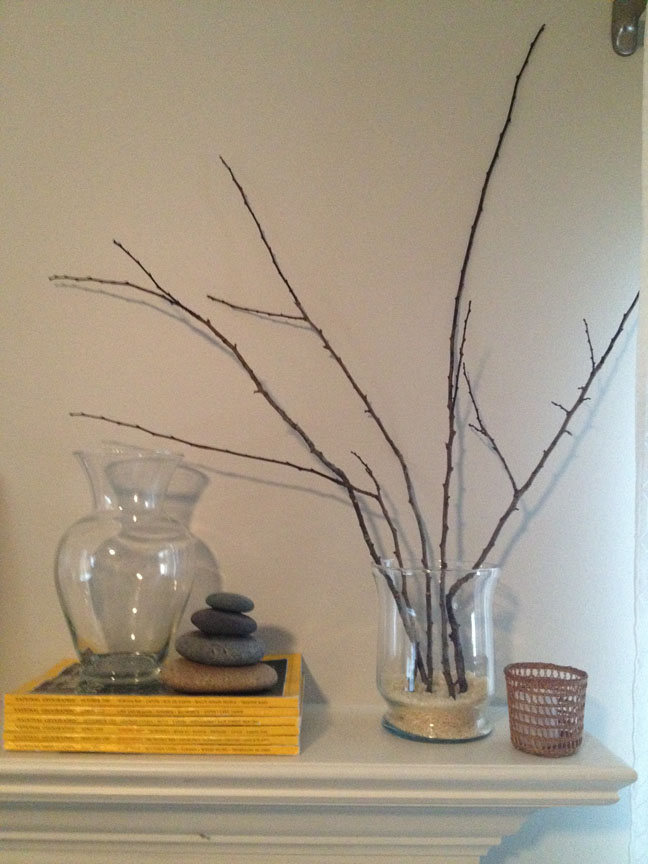
On the end I have a wicker votive holder that I grabbed before Christmas and a glass hurricane with some tall, elegant sticks. The hurricane was originally bought to use at my wedding reception and the sticks are from - where else? - my yard. Only losers pay money for stickly vase fillers.


My next mini-vignette has a short stack of vintage National Geographic mags, an owl that was my great-grandmother's and a vase with pennies in it. Why pennies? It's because my great-grandmother (the original owner of the owl) had the nickname Penny and I thought it would be a nice little tribute. I'm a sucker for unique and sentimental decor. I got the idea for using National Geographic magazines as decor from Apartment Therapy a while back and it was just a matter of time before I snagged some on Freecycle.


On the other side I have another wicker votive and stick-filled-hurricane - twinsies! - that add balance and symmetry.


This mini-vignette has more National Geographics, an empty vase (from a thrift store?) and a stack of rocks that I stole brought home from a beach when we went to the west coast a few years ago. For added stability I glued the rocks together with some clear liquid nails. Those rocks aren't splitting up anytime soon.


In the middle I have the pair of check-envelope prints I made last summer and this silver-toned peanut my mom got for me at an estate sale.


Like I said, it wasn't hideous or anything, but it wasn't as dynamic as I was shooting for.

MANTLE 2.1

Before I show you the new mantle design I want to start with the cast of characters. Partly to heighten your sense of anticipation, but mostly because I don't want to write things the same way twice. It's all about me.

New Players:

blue ombre vase I just snagged from Home Goods for $7
sterling silver Jefferson cup my parents got as a wedding gift
white vase, also from Home Goods for $7
mercury glass bird on it - $8 from Home Goods
Returning Cast Members:

holiday wreath
wicker votive holder (still using two of these)
just one hurricane full of sticks - the only difference from before is I doubled up on sticks and vase filler (which is uncooked rice, by the way)
vintage owl
estate sale peanut which - surprise! - is a storage box (nothing in it just yet)
stack of rocks (and the same National Geographics)


Mini-Vignettes:


I paired the new vase with the vintage owl because I liked how the vase pulled out the blue details on the owl. And those two play nicely with the glass hurricane and one of the wicker votives.


On the other side I sat my cheerful little bird on the magazines, put more sticks in my new white vase and filled in the little spaces with my west coast rocks and the other votive.


In the middle I centered one of the envelope prints under the wreath and flanked it with the silver peanut and Jefferson cup. Then I just added 2 glass vases I've had for years because they fill the space nicely without being visually intrusive. I haven't added the pennies back in yet, but I'm trying to figure out where to put them. Maybe in the vase behind the peanut?


And now, the big reveal...

ta-da!

Much better, right? I just love this arrangement. It's balanced without being so on-the-nose symmetrical. I think putting all the magazines on one side went a long way toward creating more visual interest. I also like how the two stick arrangements have such different shapes. I can't take credit for that - it's all because one vase has a bigger opening than the other - but since I'm the one that picked the vases, maybe I can take full credit. I still have one big craft project up my sleeve that will eventually replace the wreath, but for now I think the mantle is pretty settled. I'm not one of those people that likes to shake things up by swapping out decor all the time so the mantle will probably look like this for a while.

We're almost done here, but I can't let you leave without a backstage pass into my crazy. When I went to my yard to get more sticks the trees were wet from a recent rain which meant my sticks had to dry before I could put them on display. So what's a girl to do? Hang some sticks from a laundry rack, that's what.

Stones May Break My Bones, But Sticks Are Great For Holding My Purse


Allow me to explain that bizarre title. I just got the Sticks multi-hook rack and I love it. Love, love, LOVE it. And for just $20 you should, too. The Sticks is designed by Umbra and sold at The Container Store (among other places). It easily ups the cool factor of my foyer by at least 50%.


When it's not in use I can return the pegs to their upright and locked positions and this coat rack could pass for some sculptural wall art. But when I need a place for my purse or hubby's lunchbox I just flip down a peg for some much-needed storage space.


With 5 operable - and strong! - hooks that works out to a measly $4 per hook. How could you not want one? If you were ever inspired to do something I did, this should be it. This is way cooler than crafting with the contents of your recycling bin.

'Tis The Season to Re-Purpose!


You might think that with all this holiday celebrating I haven't had time to make stuff out of garbage and scraps. You would be WRONG! I'm not just talking about my cheap and easy wreath, either. 

What's my mystery trashy craft project? Making reusable gift bags from random fabric! I read this blog post on Choose to Thrive and decided that I, too, could and should make reusable fabric gift bags. So, faster than you can say "Why are you doing that? You know you can just buy wrapping paper, right?" I got my kiester to the thrift stores to round up my supplies.


According to my inspiration post (which I highly recommend you read, because she can ACTUALLY SEW) you can use just about any fabric you want: clothes, linens, scrap fabric, etc. However, I am a novice seamstress so I stuck to fabric (shirts and linens) that have the maximum amount of finished edges so I didn't have to, you know, finish them myself. As you can see from my handy little diagram, I sourced my materials from many different thrift store departments.


The easiest thrifted-fabric-to-gift bag is the pillowcase. Buy a pillow case and tie it shut with a ribbon. Done and done. I did go the extra mile by tacking the ribbon to the pillow case - strenuous I know. This isn't really necessary, but it keeps the ribbon from getting lost when the gift is opened. Honestly, it took me longer to Photoshop this diagram that it did to actually finish my pillow cases.
Shirts are only slightly more advanced. I ran a line of stitching across the top of the shirt to create the closure (bottom) of the bag, making sure to start just below the armpits. To get a little more room in my gift bag sometimes I curved my line toward the collar, as shown in the diagram. The existing finished hem of the shirt will be the opening (top) of the gift bag. Then I just added a ribbon, like on the pillow case. Again, I know almost nothing about sewing or constructing garments. This seam would undoubtedly fall apart with frequent washing or regular use, but for this purpose it will probably be OK.
 Here is one of the gift bags I made using the above method, both closed and open.


 I could have broken out the sewing machine for attaching the ribbon, but I'm still lazy. Why use a sewing machine when a whip stitch will do? Bonus: if the ribbon gets all wrinkled and gross after a while, I can easily snip it off and replace it.


 The last type of fabric I used was something flat and square like a napkin or place mat. The napkin can either be tied furoshiki style...


... or tied with a ribbon...


... which is tacked onto the napkin like so:


As for gift tags, I go the cheap and easy DIY route with those, too. Each tag is a rectangle (about the size of a business card) cut from card stock with the corners trimmed with my corner rounder. I use a mini-hole punch and some baker's twine to make a hang loop and then I hand write the inscription. A regular hole punch would work just fine, but I have a small one so that's what I use. Then I just run the ribbon through the hang loop before I tie the bow.


The one thing I haven't told you is WHY I am doing this. I have multiple (equally crazy) reasons:

1) I don't enjoy wrapping presents. It's not like I despise the act of wrapping presents - I'm fairly good at it - I'm just not the sort of person that delights in finding the perfect wrapping paper, crafting the perfect bow or adding the perfect finishing touches. Plus, it makes me sad to see all that effort ripped apart in seconds. I would rather sew a few dozen gift bags once than have to wrap presents year after year.

2) Wrapping presents in paper is INCREDIBLY wasteful. The paper, the tape, the boxes, the bows - so much stuff! Many people have made an effort to switch to fabric shopping bags because it's wasteful to bring home plastic or paper grocery bags. To me, wrapping gifts is no different. Buying paper gift bags is better, but you still need tissue paper to hide the gift. By using fabric wrapping materials I am keeping wrapping paper out of landfills and recycling centers AND I am giving new life to thrift store items.

3) It helps me save money. In total I spent $30 on thrifted fabric and $5 on ribbon. That's not change you can dig out of the couch, but I feel it's on par with what others spend on paper/bows/tags/etc. BUT if I get use those bags again next year, my cost moving forward will be $0, unless I have to replace some ribbons down the line.

4) I like to be weird. I am that person that gets a kick out of saying "oh, I made that" even if it earns me an odd look. I often make things I could easily buy, but that's the fun of it. I like that my pile of presents looks different from everyone else's. Plus, I get a smug satisfaction knowing I wrapped a gift in about 10 seconds - put gift in bag, tie bow. Easy peasy.

Of course, the one down side to this hair-brained scheme is the possibility that someone will keep or *gasp* throw away one of my bags. To prevent this, I am not using a fabric bag for anyone whose gift will be dropped off and opened without me being there. In those circumstances I will either use a paper gift bag, saved from gifts we received in years past, or a brown paper lunch bag. Don't feel too bad for my friends, I jazzed up the lunch bag with a stamp and some ribbon. For those opening gifts with me, I have already dropped hints like "... that's the nice thing, I can take the bags back and re-use them next year." So I've indicated I'd like them back without having to say "I'm glad you like your gift, now hand over my bag." But I will totally keep you guys in the loop if this whole thing blows up in my face and all of my bags get trashed. And not in the fun, drank-too-much-eggnog sense.
Blog Widget by LinkWithin